2.5. Using POSTMAN REST client to deploy service graph
Launch POSTMAN from desktop
Import the POSTMAN collection
The JSON collection if saved on your desktop - ‘dCloud-F5-iWorkflow-App-iApps-Final.postman_collection.json’
Click on Collection->Import
Click on the ‘Choose Files’ button and browse to the json collection and import it
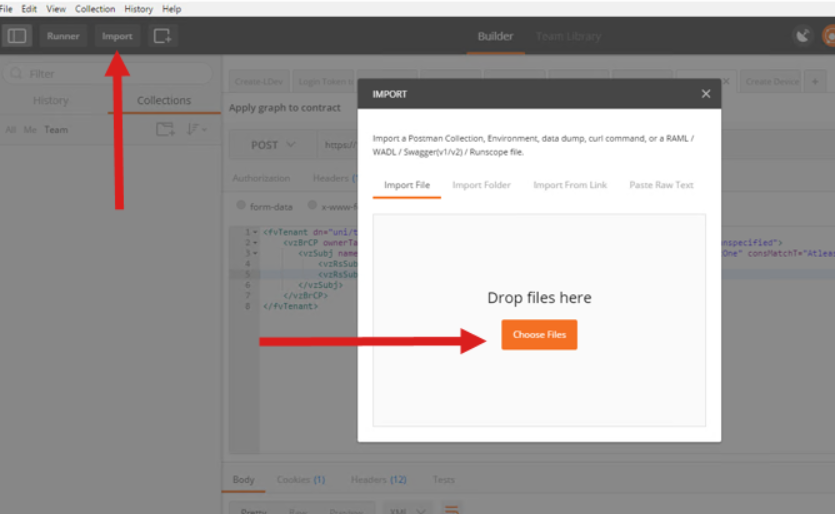
The POSTMAN collection will be loaded in your POSTMAN window:
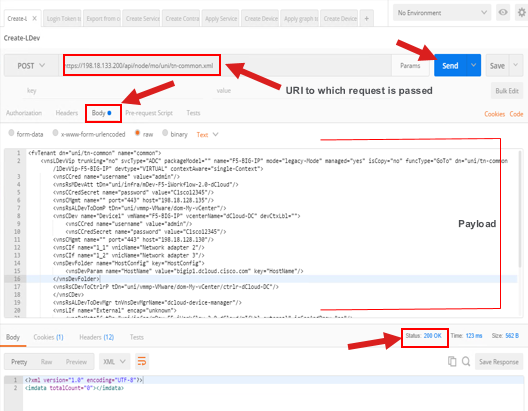
To view what each API call executed, click on the POST requests
Click on the Body to view the payload being passed
Click the Send button to execute the request
Check the status at the bottom of the window to see if the request got executed successfully (200 OK)
Note
Device package install, device manager configuration has already been done, POSTS are from the point of when a graph is to be created
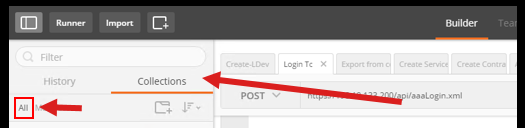
Run each postman POST and then see the corresponding object created on the APIC
- Login Token to APIC – Used for authentication to the APIC. The response to the POST operation will contain an authentication token. Subsequent operations on the REST API will use this token value to authenticate future requests.
- CreateDeviceManagerType – Used to create a device manger type under L4-L7 services->Inventory
- CreateDeviceManager-Common – Will create a device manager which has iWorkflow credentials under tenant common
- Create-Ldev-Common– Creates a logical device cluster on the APIC in tenant common
- Export from Common to SJC tenant – Exports the LDev from common tenant to SJC tenant
- Scope Network under AP – This will scope the network parameters like self IP/route under the application profiles
- Create contract – Creates a contract to be used in tenant SJC
- Assign contract to web EPG
- Assign contract to app EPG
- Create service graph template – Creates the service graph template to be used
- Apply service graph template – Specifies the parameters (virtual server/pool. Pool members etc.) to be configured for this particular graph
- Create device selection policy – Creates a device selection policy (This construct gets created automatically when using the UI, this is an extra step needed when using automation)
- Apply graph to contact – Attach the graph to the contract
This conclude Scenario 4 “POSTMAN REST client” lab.
- Reset APIC Simulator
APIC Fabric Members are created by default, so that the demonstration can begin with the creation of the APIC objects.
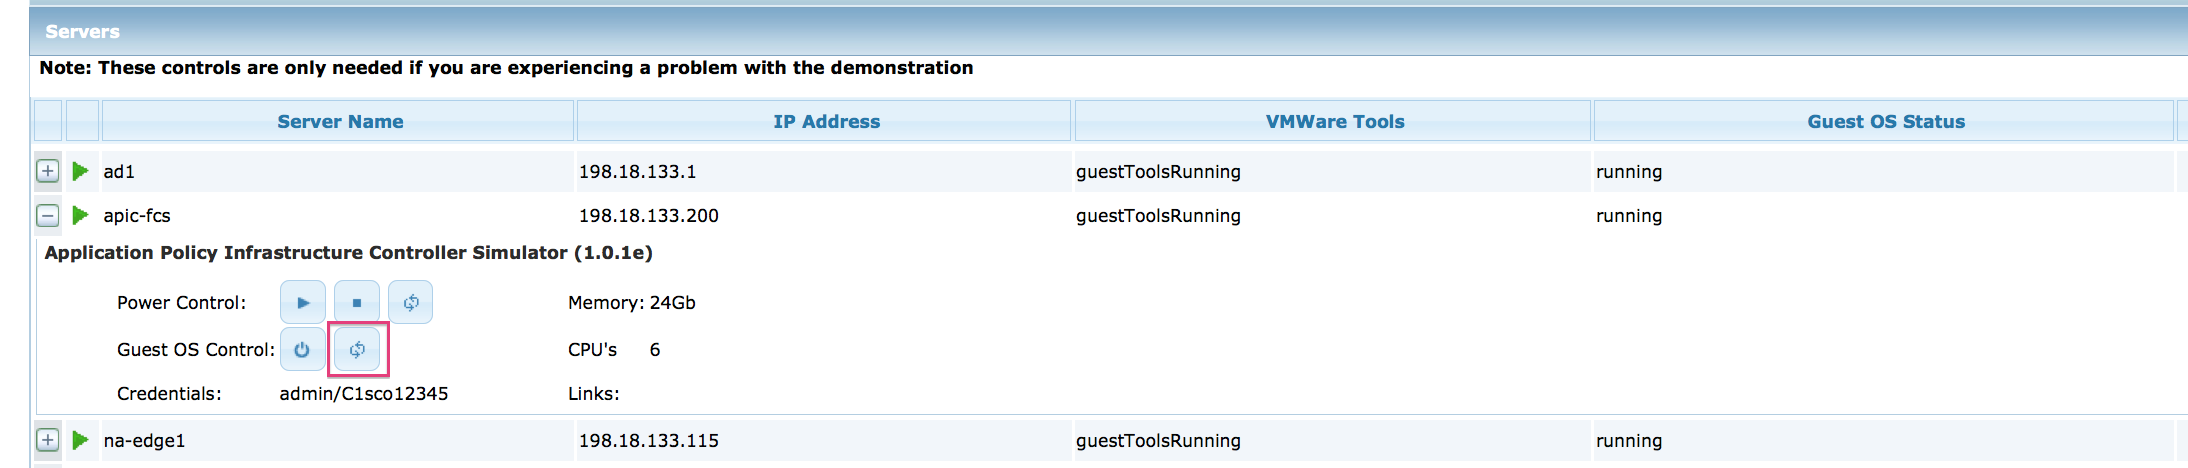
If you want to demonstrate the fabric discovery, reboot the apic-fcs via Guest OS Control as follows:
From the Demo Dashboard, click Servers.
Servers Tab

From the Servers list, click the
 next to
apic-fcs.
next to
apic-fcs.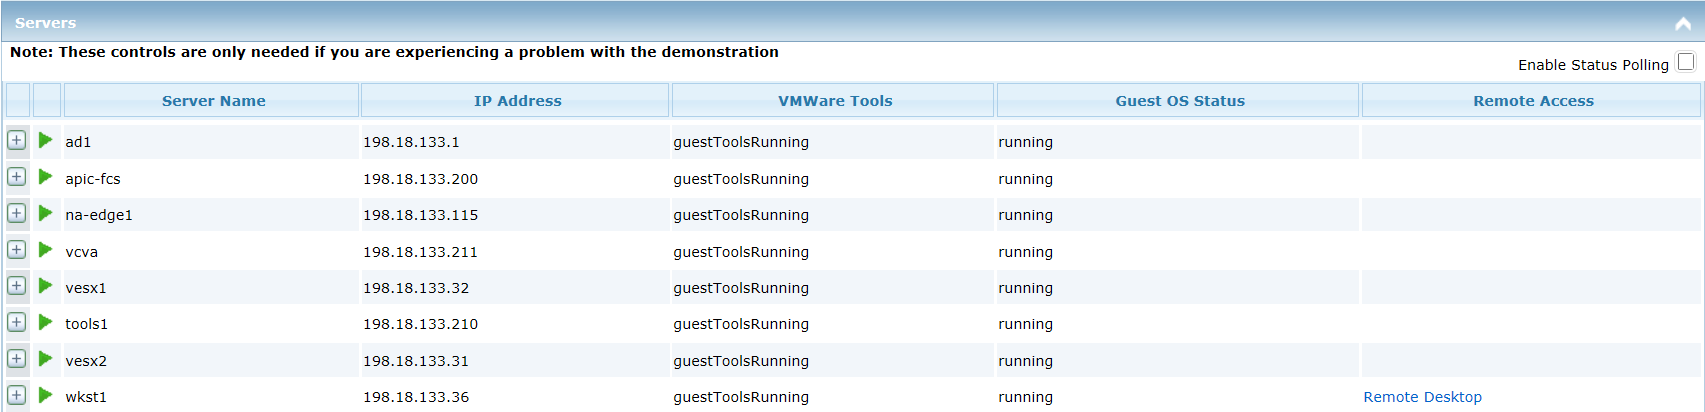
Click the Reboot button in Guest OS Control to restart the server.
Note
It will take up to 5 minutes before you can login and rebuild the Fabric using one of the Fabric Discovery methods in Appendix B.
- Fabric Discovery
If they are not configured, use one of the three methods below to configure:
| Method | Automation Level | Explanation | Completion Time |
|---|---|---|---|
| Script Configuration | High | Skip the configuration steps and discover the APIC Fabric automatically, as shown in Configure APIC Fabric Using Scripts. | 1 minute, followed by
15 minutes to build the fabric
|
| Wizard Configuration | Medium | Set up the APIC Fabric using the Postman–REST client, as shown in Configure APIC Fabric Using Postman–REST Client. | 5 minutes, followed by 15 minutes to build the fabric |
Note
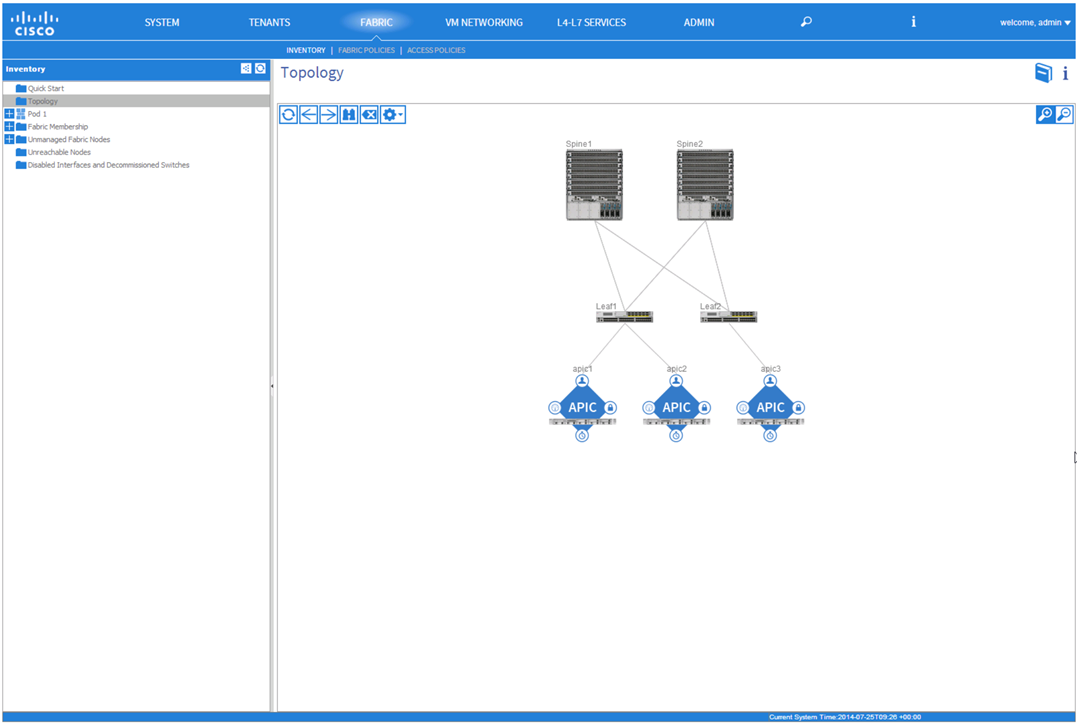
The full fabric discovery can take up to 15 minutes. The apic3 controller will be discovered after all the devices are discovered. You can check monitor the progress by selecting Topology from the Inventory pane in the APIC GUI. While the discovery is taking place, you can complete Scenario 1, which ends in the APIC Topology window showing the discovered elements.
Demonstration Steps
2.5.1. Configure APIC Fabric Using Scripts
From the demonstration workstation, click the Build ACI Fabric icon.

Type Y <Enter> at the Do you want to continue (Y/N)? prompt. The script will begin building the fabric, which will take about 15 minutes.
Build ACI Fabric Script

Type Y <Enter> at the Do you want to continue (Y/N)? prompt. The script will begin building the F5, which will complete before the ACI fabric is set up.
2.5.2. Configure APIC Fabric Using Postman–REST Client
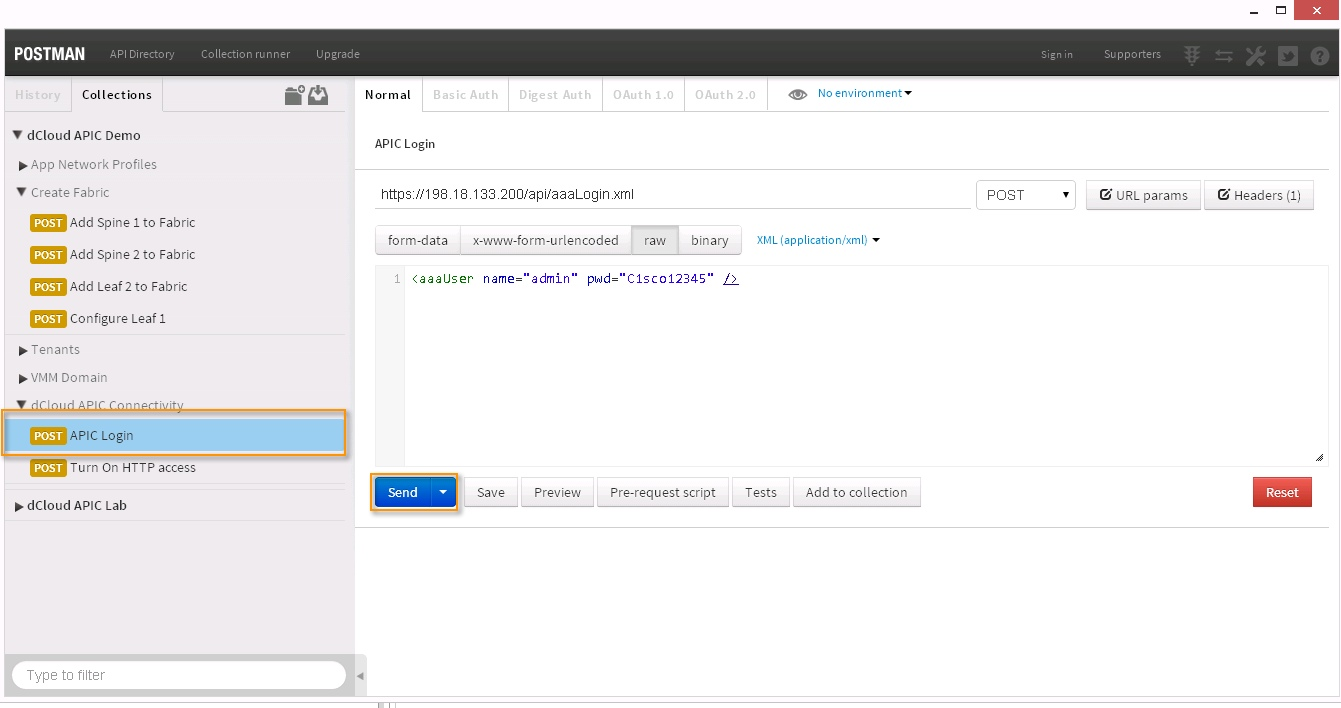
From the demonstration workstation, launch ‘APIC Login’, and then log in to the Application Policy Infrastructure Controller with the following credentials: Username: admin, Password: C1sco12345.
From the menu bar, click Fabric.
From the sub-menu bar, click Inventory.
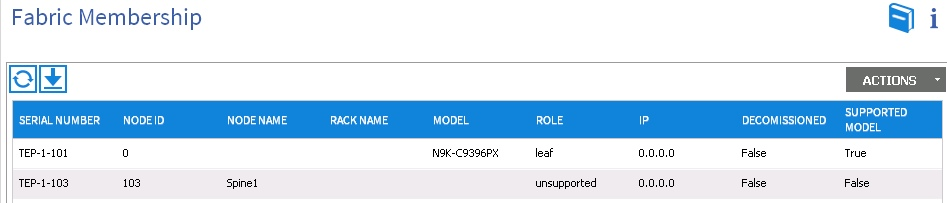
In the left-pane, choose Fabric Membership.
Review the current members of the Fabric.
Fabric Membership

Launch the Postman – REST Client [
 ] from the taskbar.
You are automatically be logged in. This is where you will register
the switches for the APIC.
] from the taskbar.
You are automatically be logged in. This is where you will register
the switches for the APIC.Note
If you get a status of 403 Forbidden while performing the activity in this scenario, review the text below for more information on the error. If you see Token was invalid (Error: Token timeout), this means that your session has timed out. You will need to launch the APIC Login POST [
 ] and then proceed with the
next POST.
] and then proceed with the
next POST.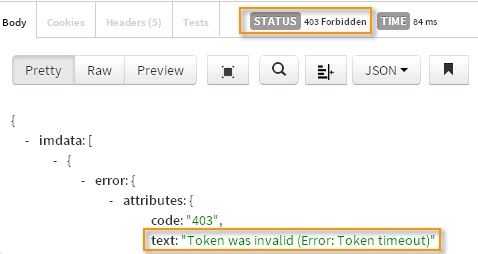
In the left-pane, click the arrow [
 ] next to dCloud APIC
Demo, and then click the arrow next to Create Fabric and
dCloud APIC Connectivity.
] next to dCloud APIC
Demo, and then click the arrow next to Create Fabric and
dCloud APIC Connectivity.dCloud APIC Demo
Go to dCloud APIC Connectivity and then choose APIC Login. Click Send to connect to the APIC.
APIC Login and Send
Review the Status of the submission. A result of 200 OK means the submission was successful.
Status

Go to Create Fabric.
Choose the Add Spine1 to Fabric post. Click Send to configure the first spine,a and then it will discover the others.
Review the status of the submission.
In the APIC application window, you can see Spine1 is now part of the Fabric Membership.
Fabric Membership
Go to the Postman – REST Client window.
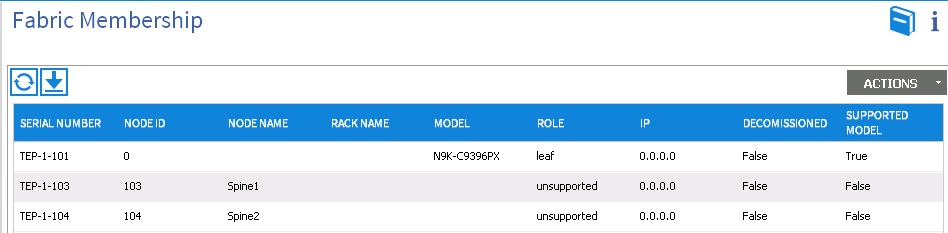
Under Create Fabric, choose the Add Spine2 to Fabric post and then click Send to configure the second spine.
Review the status of the submission.
In the APIC window, you can see Spine2 is now part of the Fabric Membership.
Fabric Membership
Go to the Postman – REST Client window.
Under Create Fabric, choose the Add Leaf2 to Fabric post.
Review the command for this post and you can see that it:
- Looks for the serial number (TEP-1-102)
- Sets up the serial number for node 102
- Names Leaf2
Add Leaf2 to Fabric
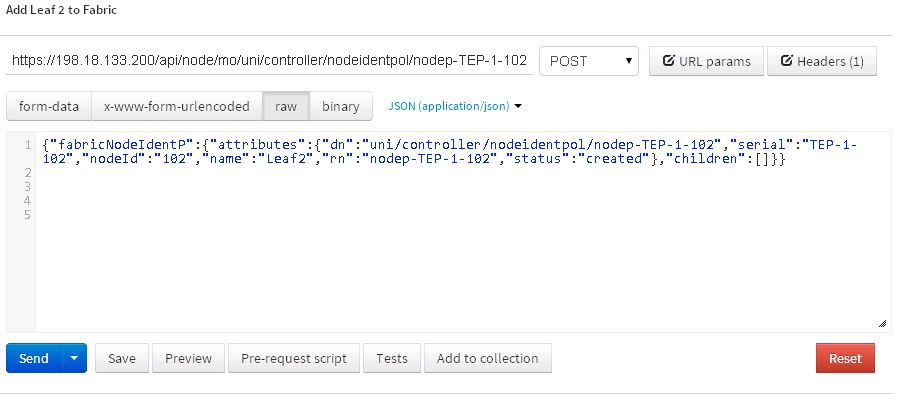
Click Send.
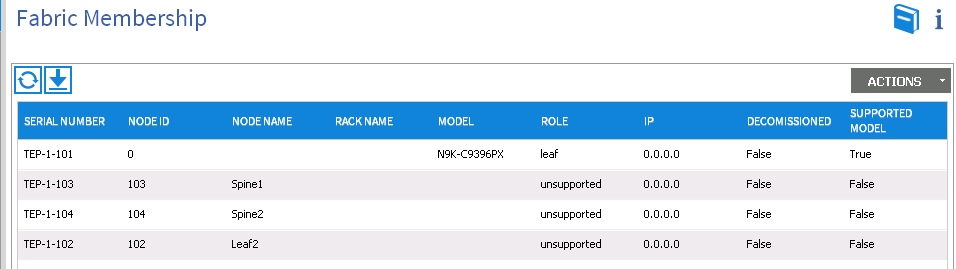
Review the status of the submission.
In the APIC window, you can see Leaf2 is now part of the Fabric Membership.
Fabric Membership
Go to the Postman – REST Client window.
Under Create Fabric, choose the Configure Leaf 1 to Fabric post, which will update the first member of the Fabric.
Click Send.
Review the status of the submission.
In the APIC window, you can see that Node ID and Node Name have been set for serial number TEP-1-101.
As it discovers Leaf1, an IP address is allocated.
The discovery will continue until it finds all of the links to the other members and populates the IP Addresses.
Fabric Membership

Wait for discovery to finish. In the APIC window, select Fabric > Inventory from the main menu. Click Topology and demonstrate that the entire fabric has been discovered and is included in the topology.
Fabric Discovery Topology